
Why Modular Building Seams Leak: Three Joints, Four Lines of Defense

Leaks in modular buildings rarely happen across large surfaces.
The middle of a wall panel, the middle of a roof panel — these almost never fail, because the panel itself is continuous and water has no way in. The real leaks almost always occur at the interface where a house is “split into boxes and reassembled”: the horizontal seams between roof modules, the vertical seams between exterior wall panels, and the junctions where modules meet the foundation or floor slab.
In a typical after-sales log, leak complaints break down roughly like this: roof seams account for about half, exterior wall vertical seams and door/window openings about 30%, and the remaining 20% at floor slab junctions and exposed pipe penetrations.In other words, leaks aren’t a case of “bad materials” — they’re a case of water at a joint having nowhere to go.
This article breaks the problem into three joints, four lines of defense, and one site inspection step that is the easiest to skip.
1. Start with the right mindset: leaks are a “path problem,” not a “sealing problem”
The most common mistake in the industry is to caulk wherever it leaks. That approach has two problems:
First,caulk is the last line of defense, not the first. Once water has pooled in the seam, even the best sealant is only holding it back under pressure, and its service life drops sharply.
Second,water travels. The leak you see indoors is usually not where the water got in. Water pooling on the roof can enter through a single screw hole, run three meters along a stud cavity, and drip down on the other side of the ceiling.Looking for the leak point on the interior side almost always means looking in the wrong place.
The right approach is to turn it around and ask three questions:
- Where does the water get in (entry path)?
- Once inside, where does it go (drainage path)?
- When it can’t drain away, where is it finally stopped (sealing and vapor barrier)?
The answers to these three questions are the joint design. Once the order is reversed — sealing first, drainage never — a leak is only a matter of time.
2. Three critical joints: where water most easily gets in
Joint 1: the horizontal seam between roof modules
This is the highest-risk spot, because it is a horizontal surface directly exposed to rain, and the modules on either side of the seam inevitably have slight height differences from transport and lifting.
A roof seam done right must satisfy three things at once:
- there must be a drainage layer or channel beneath the seam, rather than letting water fall straight onto the insulation or ceiling;
- the roof panels on both sides must overlap in the direction of water flow, with the upper panel lapping over the lower one, and enough overlap for local wind and rain conditions —if the direction is reversed, no amount of caulk will stop wind-driven rain;
- the seam must avoid areas where water collects. The roof panels themselves need a drainage slope (typically no less than 2%, per project specifications), and the seam should sit on the drainage path, not in a low spot.
On many projects, the roof panels arrive pre-assembled and the crew simply tapes a strip of waterproof membrane over the joints or runs a bead of sealant along them on site.In dry regions that may hold up for years. In typhoon or heavy-rain regions, it usually fails in the first rainy season.
Detail 2: vertical wall joints and window and door openings
The problem with vertical joints isn’t that “too much water gets in” — it’s that the water that gets in can’t get out.
The right approach is to treat the exterior wall as a double skin Look at it this way: the outer panel is the first line of defense against water, and behind it you need a cavity with a drainage and ventilation outlet at the bottom and the insulation and vapor barrier on the inside. This is the well-known rainscreen principle:let a little water in, but give it a path down and out.
Three execution details decide whether it works:
- Lap direction: every horizontal lap must have the upper panel overlapping the lower one, and vertical joints should be sealed toward the leeward side rather than simply caulked down the middle;
- The cavity must not be packed with insulation: stuffing the cavity full to “insulate better” cancels the drainage channel — the most common well-intentioned mistake;
- The sill of window and door openings is a hidden weak point: the sill needs an outward slope and a drip edge, the lower corners of the window need drainage outlets,and the waterproof membrane around the opening must connect to the drainage path of the wall cavity, otherwise water pools behind the window frame and seeps indoors.
Detail 3: module-to-foundation and module-to-module floor junctions
What leaks here isn’t rain — it’s capillary water and water wicking back from standing water.
- Waterproofing and flashing at the base of the module: groundwater, splash, and standing water on top of the foundation seep up through gaps along the edge of the module floor. The standard practice is to keep the finished floor above outdoor grade and install flashing at the junction — commonly at least 150 mm (confirm against local code) — and leave access space on the interior side;
- Pipe penetrations: where plumbing and electrical lines pass through the floor are the second most common leak point. Sleeves must rise above the finished surface, with a flexible seal between sleeve and pipe.Don’t just fill the opening with expanding foam;
- The intermediate floor when stacking: when modules are stacked, a horizontal seam forms between the bottom of the upper module and the top of the lower one. Waterproofing this seam depends on the drainage slope on top of the lower module plus the water-guiding detail on the bottom of the upper module, not on sealant strips alone.
Part 3: four lines of defense — sequence matters more than materials

Abstract the details above and you get four lines of defense.Their order cannot be reversed. Each one exists to reduce the load on the next.
| Order | Line of defense | Function | What happens if it fails |
| First | Structural drainage | Slope, lap direction, drip edges — stop water from lingering at all | Water sits at the joint and all three downstream lines take the load |
| Second | Cavity and drainage layer | Give water that has already entered a path back out | Water collects in the insulation, seeps out from the inside, and the insulation fails |
| Third line of defense | Sealing (gaskets, sealant) | Blocks wind-driven rain and capillary water | Wind-driven rain enters the cavity directly, exceeding drainage capacity |
| Fourth line of defense | Interior vapor barrier and drainage pan | If the first three fail, keeps water behind the finish and drains it out | Water enters the interior, causing visible leaks and mold |
The most useful takeaway from this table: the third line of defense is not the first. When a supplier’s solution amounts to just “apply sealant,” that joint has no design, only a finishing touch.
4. The acceptance step most often skipped: the water spray test
After assembly and sealing, most projects are accepted by “checking for water stains“. That step is meaningless in the dry season—leaks only show up when it rains, and rain usually comes after handover.
What actually works is an on-site water spray test: spray a pressurized nozzle at the joint continuously for a set period while watching from the interior side. Common international methods are AAMA 501.2 (field nozzle method) and ASTM E1105 (water penetration test); the specific pressure, flow rate and duration should follow the project specification or contract.
Three things are easy to get wrong when running it:
- Watch the inside, not the outside. Seeing no water on the outside is normal—the water has already gotten in. Observation points should be interior joints, the lower corners of window openings, and ceiling access panels;
- Do a mock-up unit first, then the batch. The first assembled unit passing the spray test proves the joint detail itself works; if the mock-up leaks, the hundreds of units after it will leak too;
- Put the results in the acceptance record. Spray locations, duration, observations, corrections and retests,all kept on file. In a dispute, this is worth more than any verbal promise.
5. How Weiland handles joints
Our principle for joints comes down to one sentence:Whatever can be done in the factory stays out of the field.
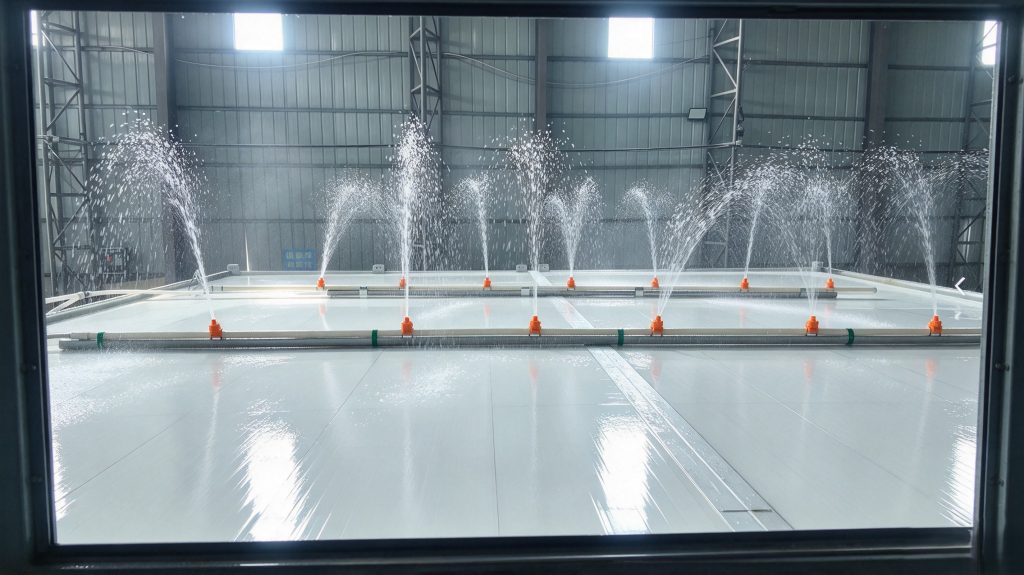
Shown: Weiland factory water spray test
- Pre-installed gaskets: sealing gaskets on module mating surfaces are installed at the factory; on site, crews only compress them and touch up locally, reducing variation in field work;
- In-joint drainage: roof and floor slab joints are detailed with a drainage path so water doesn’t linger inside the joint;
- Joint details ship with the product: each project gets joint detail drawings showing water flow direction, overlap, seal locations and inspection points, so crews build to the drawing instead of to habit;
- Water spray acceptance recommendation: we recommend clients run a water spray test after the first unit is assembled; we can provide joint inspection checkpoints and correction advice. For projects in harsh climates (typhoon zones, rainy regions, coastal high-salt-fog areas), we don’t recommend skipping this step.