
Prefab Floor Plans Explained: Layout, Floor Area and Height
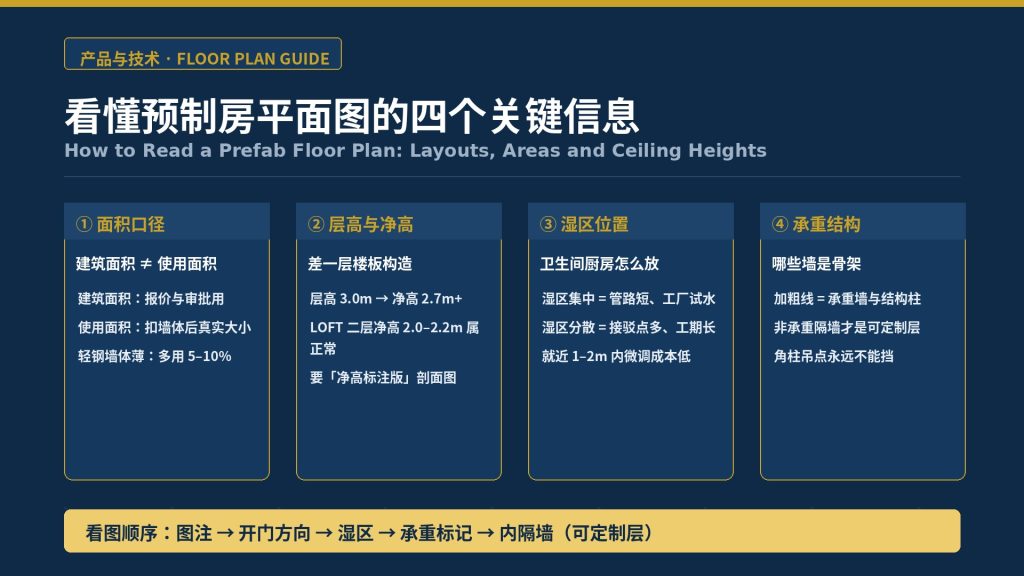
Four things to check on a prefab floor plan
Handed a floor plan for a modular prefab home, most buyers count the bedrooms and bathrooms first. Fair enough, but what really decides whether the home works well and whether the quote is honest is usually four other details on the drawing: how floor area is measured, the ceiling height figures, where the wet zones sit, and where the load-bearing structure runs. This article walks through how to read a plan, item by item, using the drawings for two common models (S780 LOFT and S900) as examples.
> Note: the figures in this article are illustrative examples for explanation. For actual specs of a given model, refer to the product page and drawings.
1. Floor area: gross floor area, axis area and usable interior area are three different numbers
For the same modular home, “60 square meters” can mean three different things:
– Gross floor area: measured to the outer face of the exterior walls; the figure most often used for quotes and permits;
– Axis area: measured along the structural axes; common in modular industry production planning, and usually slightly smaller than gross floor area;
– Usable interior area: what is left after walls, studs and fixed furniture, i.e. the floor you can actually walk on. This is the real size you live in.
The gap between the three is “how thick the walls are and how much is shared space.” Light steel modules have thinner walls than traditional cast-in-place construction, so the same gross floor area typically yields 5%–10% more usable area. That is one of the core selling points of modular structural efficiency.When reading a plan, first check which measure the drawing notes use, then compare quotes from different suppliers— comparing figures measured different ways tells you nothing.
For LOFT layouts there is one more question:how is the second-floor area counted. In loft layouts like the S780 LOFT, the second floor is usually partial: it covers only part of the area above the kitchen and bathroom below, and the rest is open to the full height. The plan shows the second-floor slab line, and how far it extends and how much full-height space is left directly affect the usable second-floor area, how open the interior feels, and the cost.
2. Floor height vs. clear height: one slab makes a noticeable difference
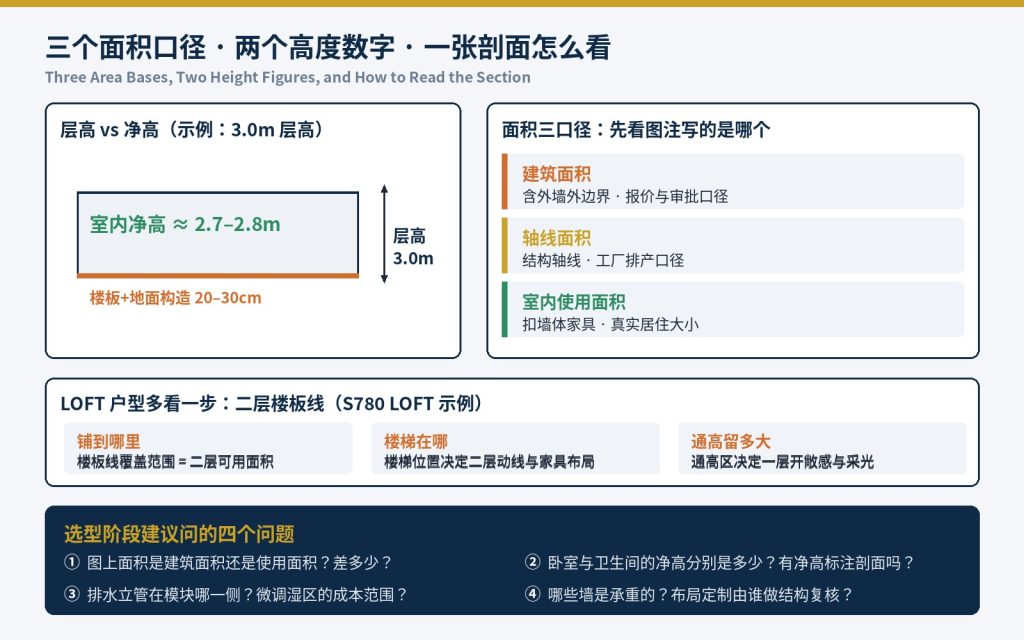
The three floor area measures and floor height vs. clear height compared, plus how to read the LOFT second-floor slab line
The “floor height” marked on drawings is the vertical distance from floor to floor (or to the structural roof surface). The clear height you feel standing in the room is that minus the thickness of the floor slab and floor build-up, typically 20–30 cm for light steel modules.
This creates a common gap: a module marked “floor height 3.0 m” has a clear height of roughly 2.7–2.8 m indoors. The LOFT second floor loses the second-floor slab and floor build-up on top of that,so a clear height of 2.0–2.2 m in the loft area is normal design, and the sloped-edge zones are lower still. If the country where the project is located sets a minimum clear height for living space (most codes require bedrooms to be at least 2.2–2.4 m), these two figures have to match up—Before you order, ask the supplier for a section drawing with clear heights marked, not just the overall floor-to-ceiling height.
3. Wet zones: where the bathroom and kitchen sit decides how the plumbing runs and what changes will cost
On the floor plan, the position of the bathroom and kitchen is the most valuable layout decision in a modular building:
– Clustered wet zones(bathroom next to kitchen, stacked floor to floor) mean short supply and drain runs, fewer penetrations through the floor slab, simpler water and power testing, and pressure testing that can be completed at the factory;
– Scattered wet zones at opposite ends of a module force pipes to cross between modules, adding on-site connection points, leak risks and site time.
Watch for two markers on the drawing:the drain stack position(usually a heavy solid line or a dedicated symbol) and the floor slab penetration layout. If you want to change the layout later, first check whether the wet zone can move a short distance: shifting fixtures within 1–2 m of the original wet zone is cheap, while moving a wet zone to another room basically means redoing the plumbing.
4. Load-bearing structure: which walls you can move and which are the skeleton
The load-bearing system of a light-gauge steel modular building consists of stud walls + floor beams + corner columns. Floor plans usually mark load-bearing walls and structural columns with bold lines or shading:
– Load-bearing walls and exterior walls: these carry floor loads and lateral forces, so you cannot cut large openings or remove them; the position and width of door and window openings have already been checked in the structural calculations;
– Non-load-bearing partitions: mostly light-gauge steel stud and gypsum board partitions whose position can be adjusted; these are the main target when customizing a layout;
– Corner columns and lifting points: these carry the lifting loads and must never be blocked by furniture or partitions.
The right order for a custom layout is:adjust non-load-bearing partitions, doors, windows and interior finishes within a fixed load-bearing frame, which is why the OEM/ODM customization process puts structural calculations first.
5. Reading a sample S900 plan: a three-minute walkthrough

Take a one-bedroom, one-living-room flat-roof module like the S900. Read the plan in this order:
1. Start with the notes: floor area basis, floor height figures, wall thickness;
2. Check the outer outline and door swing: the entry door and balcony door positions set the furniture circulation and how the module lines up with the site foundation;
3. Find the wet zones: are the bathroom and kitchen adjacent, and which side is the drain stack on;
4. Find the load-bearing markers: confirm which lines cannot move;
5. Finally, look at the partitions and furniture layout: this is the customizable layer.
Four questions to ask at the specification stage
1. “Is the area on the plan gross floor area or usable area? How big is the difference?”
2. “What are the clear heights of the bedroom and bathroom? Is there a section drawing with clear heights marked?”
3. “Which side of the module is the wet zone drain stack on? What does it cost to make small layout changes later?”
4. “Which walls on the plan are load-bearing? Who signs off on the structural review for a custom layout?”
A supplier who will give you a dimensioned section drawing and answer question 4 clearly usually produces drawings that hold up to review.